|
Level 4
Applied Dimensional Metrology
Course Outline
|
|
Course Objective
|
To provide hands on insight to intermediate and advanced
applications and analysis of 2D & 3D measurement instruments
used to determine full compliance to mechanical drawings. Gain
insight to key error influences that can provide tremendously
different measurement results and to know how to optimize the
measurement programs to effectively reduce the measurement
error/bias. Gain insight to the strengths and limitations of
Gage Repeatability and Reproducibility (GR&R) by making visible
some key error influences that can cause significant biases in
the results and also showing how to test and correct for these
biases.
|
|
Course Length |
2 Days (16-hours) |
|
What You Will Learn |
3D Measurement |
|
|
-
Traceability of measurement to national
laboratories
-
Limitations of 1D and 2D measurements
-
Understanding key error influences and
how to test for and correct
|
|
|
Single Sensor and Multi-Sensor Coordinate Measuring Machines |
|
|
-
Video sensors, laser sensors, whitelight
interferometers and micro probes
-
Manual & automatic (DCC) CMMs, single
point touch sensors, scanning sensors and measuring arms
-
3D surface and form instruments
-
Introduction to traceable artifacts and
value of interim artifact testing
|
|
|
Methods for analyzing and interpreting data results (2D & 3D) |
|
|
-
Working with CAD and measurement data
(point clouds)
-
Analytical software – strengths &
weaknesses
-
Understanding least-squares -vs- Minimum
zone fitting
-
Understanding criticality of simultaneous
requirements within the standards (ASME, ISO, other)
|
|
|
Measurement Uncertainty/Traceability |
|
|
|
|
|
In each subject group an overview of the tools is followed by a
demonstration of best application practices and a discussion of
calibration issues and measurement uncertainty factors. Each
subject session is concluded with a hands-on lab activity and
includes discussions on understanding key error influences and
how to test for and correct them.
When practical, customer parts will be utilized during this
seminar to provide the greatest understanding of measurement
technology applicable to customer parts. |
|
|
Various parts will be utilized during
this seminar to provide the greatest understanding of
measurement technology applicable to multiple
industries. Students are encouraged to bring a part
(with CAD modal and drawing) that represents their
measurement challenges (non-confidential). |
|
Who Should Attend
|
Anyone requiring an advanced understanding of measurement
systems used for measuring mechanical components and assemblies.
Specifiers and decision makers of engineering requirements and
specifications as well as specifiers of manufacturing processes
and measurement applications and anyone doing statistical
analysis of design, manufacturing or measurement data.
Engineers, designers, metrologists, technicians, machinists,
toolmakers, designers, senior inspectors, senior technicians,
statisticians and mechanical engineers at all levels.
|
|
|
Due to the direct hands-on training in this course we limit each
session of this course to 20 participants. Limiting the number
of participants allows us to maximize the amount of time each
student will be able to have hands-on utilization of each
measurement instrument.
|
|
Prerequisites |
GD&T “Advanced Applications & Analysis.” An advanced
knowledge of GD&T is required to allow all participants to be
successful in this class. If not proficient in GD&T at an
advanced level it is strongly recommended that all individuals
take or retake the advanced course to ensure an optimum and
proficient level of understanding .
|
|
|
The
Applied Dimensional Metrology
Course Outline is available in PDF format. |
|
|
Example Graphics from Course |
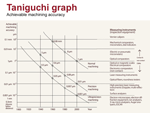
Taniguchi graph |
Size vs Form vs Surface |
 |
 |
|
|
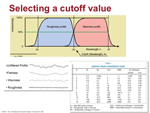
Selecting a cutoff value |
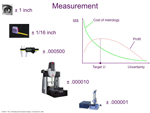
Measurement |
 |
 |
|
|
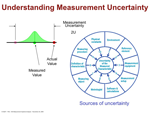
Understanding Measurement Uncertainty |
|
 |
|
|
Note :
 Click
on any image to zoom in. Click
on any image to zoom in. |
|
